
Choosing the right tile size can dramatically transform the look and feel of your home…
Professional Tiling: A Complete Process Breakdown
Getting a new tile installation in your home is exciting, but many homeowners feel unsure about what the process actually involves. Understanding what happens during a professional tile installation can help you prepare properly and feel confident about your decision. This guide walks you through each step of the process, so you know exactly what to expect when working with professional tilers.

Initial Consultation and Planning Phase
The tile installation journey begins before any work starts at your home. During the initial consultation, professional tilers will visit your property to assess the space and discuss your vision. They will measure the area, examine the existing surfaces, and talk through your tile choices, layout preferences, and budget.
This is when they will explain different tile options, discuss grout colours, and help you understand which materials work best for your specific needs. For example, bathroom installations require different considerations than kitchen backsplashes. The team will also provide you with a detailed quote and timeline for the project.
Expect this consultation to take about an hour. It’s the perfect time to ask questions about the process, timeline, and any concerns you might have. The professionals will also advise you on how to prepare your space before installation day.

Preparation and Surface Assessment Day
Before laying any tiles, proper preparation is essential for a long-lasting result. On preparation day, the tiling team will protect your furniture and flooring with plastic sheeting and remove any existing tiles, fixtures, or fittings that might be in the way.
They will then thoroughly assess the surface condition. Walls and floors need to be completely level, clean, and stable before tiling can begin. This might involve filling holes, sanding rough spots, or applying primer to ensure the tiles will stick properly.
If they discover any structural issues like water damage or uneven surfaces, they will discuss solutions with you before proceeding. While this might add time to your project, addressing these issues early prevents problems later and ensures your new tiles will last for years.
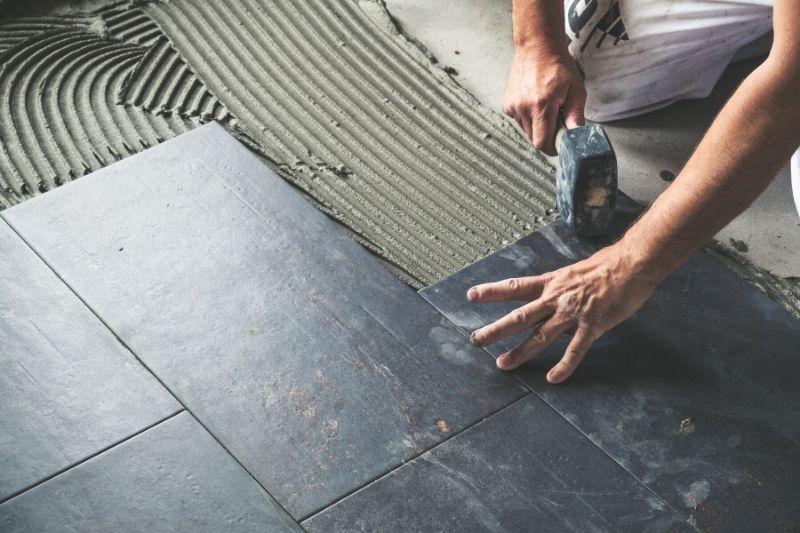
The Installation Process: Timeline and Daily Activities
The actual tile installation typically takes one to three days, depending on the size and complexity of your project. Bathroom installations usually take longer than simple backsplashes due to waterproofing requirements and more detailed work around fixtures.
Each morning, the installation team will arrive with all necessary tools and materials. They start by mixing adhesive and beginning tile placement, usually from the most visible corner or centre point of the room. They work methodically, ensuring each tile is level and properly spaced.
Throughout the day, you can expect some noise from cutting tiles and regular activity as they move around your space. Most professional teams work efficiently and keep disruption to a minimum. They will clean up daily and ensure your home remains as tidy as possible during the installation.
Don’t be surprised if the team needs to stop work periodically to let the adhesive cure. This waiting time is normal and necessary for proper installation. They might work on different sections or return the following day to continue.
Quality Control and Finishing Details
Once all tiles are installed, the focus shifts to finishing details and quality control. This phase involves applying grout between tiles, which typically happens 24 hours after tile installation to allow proper adhesive curing.
The team will mix grout to the correct consistency and colour, then carefully apply it using specialised tools. They work in small sections, ensuring grout fills all spaces evenly and removing excess material as they go.
After grouting, they perform a thorough quality check. This includes verifying that all tiles are secure, grout lines are consistent, and the overall finish meets professional standards. They will also clean any grout residue from tile surfaces and check that corners and edges are properly finished.
Any necessary touch-ups or adjustments happen during this phase. Professional tilers take pride in their work and will address any issues before considering the job complete.
Final Walkthrough and Maintenance Guidelines
The final step involves a comprehensive walkthrough with you to ensure complete satisfaction. The installation team will explain what they have accomplished and point out any special features or considerations for your new tiles.
They will provide detailed care and maintenance instructions specific to your tile type and grout choice. This includes cleaning recommendations, products to avoid, and signs to watch for that might indicate future maintenance needs.
Most professional tiling companies offer warranties on their workmanship, and they will explain what this covers during the final walkthrough. They will also leave you with contact information for any future questions or concerns.
Before leaving, they ensure your space is completely clean and ready to use. Depending on your tile type, you might need to wait a specified time before heavy use, and they will provide clear guidance about this.
Ready to Transform Your Space?
Professional tile installation transforms your home while adding lasting value and beauty. When you understand the process, you can prepare properly and enjoy the experience of seeing your space transformed by skilled craftspeople.
Tiling Sunshine Coast brings years of experience and attention to detail to every project. Their professional team guides homeowners through each step of the installation process, ensuring beautiful results that stand the test of time. Contact them today to schedule your consultation and take the first step toward your dream space.
Comments (0)